New vulnerabilities are being discovered every day, caused by configuration issues, open ports, software bugs and misuse of software features. Adversaries quickly develop exploits to take advantage of new vulnerabilities. Indeed, even a seemingly minor flaw in your security posture can be used to infiltrate your network via malware, SQL injection or other techniques, and then to gain deeper access to sensitive information and vital systems for a more damaging attack.
Continuous vulnerability management is an essential control for proactively securing your IT environment. Once integrated into your information security program, it helps boost and maintain your protection against internal and external threats. Automated vulnerability scanning tools are invaluable for scanning, identifying and prioritizing security threats to reduce cybersecurity risks.
However, choosing effective vulnerability testing tools is no trivial task. There are at least three challenges to consider:
- High volume of false positive alerts. Security team often get so buried by false positive results that they cannot quickly identify and respond to true vulnerabilities that put security and business processes at risk. This issue is especially prevalent in large IT environments with a wide range of workloads across their networks.
- Lack of vulnerability scoring. To prioritize remediation efforts, IT teams need to be able make a quick and accurate assessment of how critical each vulnerability is. Unfortunately, many tools simply do not provide comprehensive vulnerability scoring systems.
- Insufficient infrastructure coverage. The best tools provide a broad range of tests for application vulnerabilities at different levels, including asset discovery, software inventory, and functional testing.
How can Netwrix help?
Greenbone Enterprise provided by Netwrix identifies vulnerabilities in software and server configurations so organizations can close these gaps before they are exploited. It offers a host of benefits:
Flexible scan depth and speed
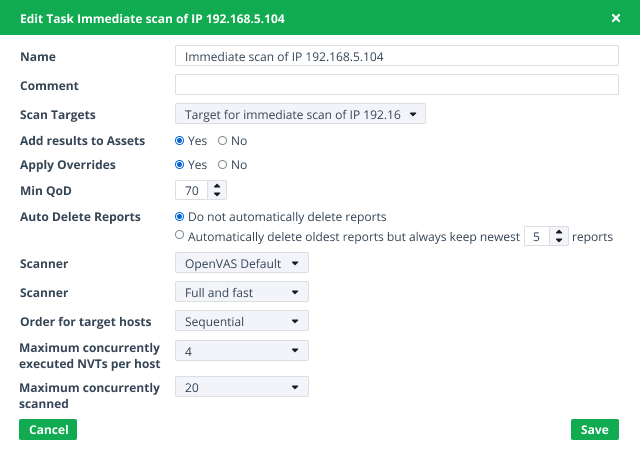
By tailoring your security vulnerability scanning strategy for different assets, you can save precious time by investigating only relevant issues. Optimize your vulnerability scanning by setting the depth, from a simple inventory scan to a thorough “All Vulnerabilities” scan. For quick results, you can use non-credentialed tests, which are closer to penetration testing; if you need higher accuracy and fewer false positives, choose credentialed (authenticated) tests.
Comprehensive coverages
The solution covers Linux and Microsoft Windows Server platforms, cloud and mobile endpoints, databases, network devices, virtual machines, and hardware and application firewalls.
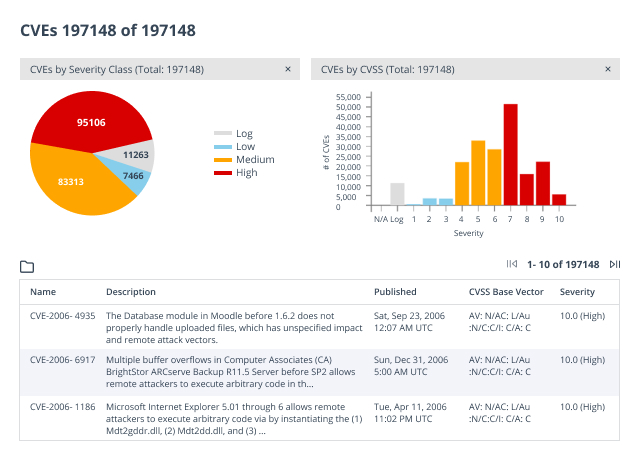
Moreover, the battery of tests used to detect vulnerabilities in your environment is continuously updated via a live cloud feed with over 66K automated network vulnerability tests. As soon as a CVE entry is created for a freshly discovered vulnerability, your scanner will be updated with a relevant test to identify the vulnerability. New vulnerabilities are added daily from trusted sources, including not just CVE but Bugtraq alerts, aggregated compliance rulesets, controls for scan agents, and embedded NMAP NSE test routines.
Vulnerability risk scores to prioritize remediation work
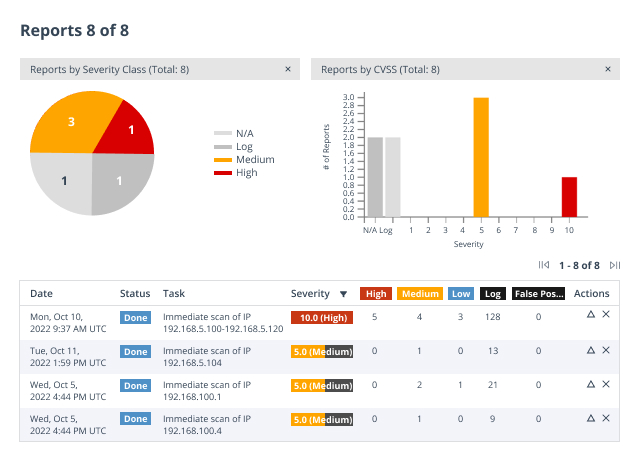
The vulnerability assessment scanning tool presents security vulnerabilities in order of severity, which enables you to focus your threat remediation efforts on the assets that pose the highest cybersecurity risk to your network security.
Clear remediation guidance
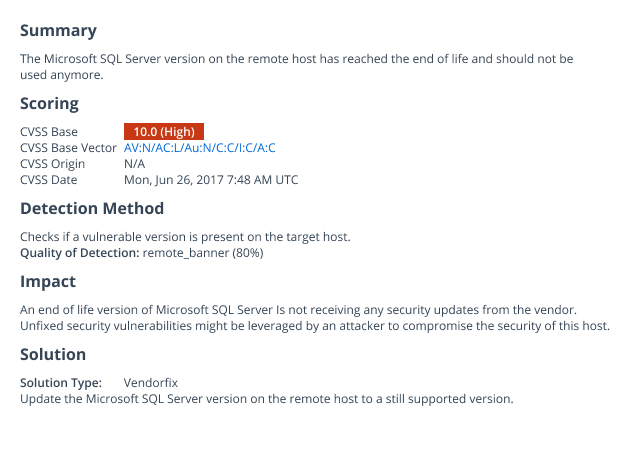
The vulnerability scanner delivers clear guidance on how to reduce your attack surface area. For example, it details whether you need to install operating system patches and security updates, or improve application security through proper configuration. It provides other essential data as well, including vendor guidance, detection methodology, and the Severity and the Common Vulnerability Scoring System (CVSS) score.
Meeting the recommendations of CIS Critical Security Controls
The solution directly addresses several controls developed by the Center for Internet Security (CIS) regarding hardening the integrity and security of your IT systems: Inventory (Control 1,2), Secure Configurations (Control 4), and Continuous Vulnerability Management (Control 7).
Deployment flexibility
Greenbone Enterprise provides a full range of deployment options, including on-premises physical machines, virtual scanning appliances and cloud-based scanning. In addition to host-based scanning, the solution also supports optional distributed scanning sensors to scan beyond the firewall without weakening security.
Flexible licensing model
Licenses are geared for an optimal number of IP scans but you are not limited to a maximum number. For example, suppose your license is optimized to scan 18,000 IPs during each 24-hour period. If you exceed that number, the product will continue scanning; your security check may just take a little longer.